環境
CentOS Stream release 9
Apache/2.4.57 (CentOS Stream)
Xserver VPS
WEBサーバーとメールサーバーを同居させる前提
| ホスト名 | 種別 | 内容 | TTL | 優先度 |
|---|---|---|---|---|
| .example.com | MX | mail.example.com | 3600 | 0 |
| A | 192.44.46.51 | 3600 | 0 | |
| TXT | v=spf1 +a:x192.44.46.51.static.xvps.ne.jp +a:mail.example.com +mx include:spf.sender.xserver.jp ~all | 3600 | 0 |
メールサーバー用ディレクトリの作成
chown -R www:www /var/www/html/mail && chmod 705 /var/www/html/mail
mail.example.com 用の独自 conf 作成
vi /etc/httpd/conf.d/mail.conf
下記を貼り付ける(キー取得用)
<VirtualHost *:80>
    DocumentRoot /var/www/html/mail
    ServerName mail.example.com

    # for Let's Encrypt
    Alias /.well-known /var/www/html/mail/.well-known

    <Directory /var/www/html/mail>
        Require all granted
    </Directory>
</VirtualHost>
キー取得
certbot certonly --webroot -w /var/www/html/mail -m info@example.com -d mail --agree-tos
各キーが生成されているのを確認
ls /etc/letsencrypt/live/mail.example.com
output
README cert.pem chain.pem fullchain.pem privkey.pem
mail.conf の編集
vi /etc/httpd/conf.d/mail.conf
下記を貼り付ける
<VirtualHost *:80>
ServerName mail.example.com
ServerAdmin info@example.com
DocumentRoot "/var/www/html/mail"
<Directory "/var/www/html/mail">
AllowOverride All
Allow from all
</Directory>
ErrorLog logs/mail-error_log
CustomLog logs/mail-access_log combined
</VirtualHost>
ssl.confの設定
vi /etc/httpd/conf.d/ssl.conf
## SSL Virtual Host Context 以降をすべて削除してある前提
下記を貼り付ける
<VirtualHost *:443>
SSLEngine on
SSLProtocol All -SSLv2 -SSLv3 -TLSv1
ServerName mail.example.com
DocumentRoot "/var/www/html/mail"
SSLCertificateFile /etc/letsencrypt/live/mail.example.com/cert.pem
SSLCertificateKeyFile /etc/letsencrypt/live/mail.example.com/privkey.pem
SSLCertificateChainFile /etc/letsencrypt/live/mail.example.com/chain.pem
<Directory "/var/www/html/mail">
AllowOverride All
Allow from all
</Directory>
ErrorLog logs/mail-ssl_error_log
CustomLog logs/mail-ssl_access_log combined
</VirtualHost>
Apache 2.4.8以降では SSLCertificateChainFile の指定は不要で、SSLCertificateFile に fullchain.pem を指定すればいいようだが、Apache 2.4.57 なので従来の方法で行く。
後々、検証した結果、Apache 2.4.57 でも下記2つの記述だけで問題なかった。
SSLCertificateFile /etc/letsencrypt/live/mail.example.com/fullchain.pem
SSLCertificateKeyFile /etc/letsencrypt/live/mail.example.com/privkey.pem
httpd リスタート
systemctl restart httpd
確認用 php ファイル作成
echo "<?php phpinfo(); ?>" > /var/www/html/mail/phpinfo.php
https でアクセスできれば OK
Postfix(送信サーバー)、Dovecot(受信サーバー)、cyrus-sasl(SMTP 認証用)のインストール
dnf -y install postfix dovecot cyrus-sasl
Postfix 設定ファイル編集
vi /etc/postfix/main.cf
myhostname = mail.example.com # FQDNを指定

#mydomain = domain.tld
#↓
mydomain = example.com # ドメインを指定)

#myorigin = $mydomain
#↓
myorigin = $mydomain

inet_interfaces = localhost
#↓
inet_interfaces = all # 外部からのメール受信を許可

inet_protocols = ipv4

mydestination = $myhostname, localhost.$mydomain, localhost
#↓
mydestination = $myhostname, localhost.$mydomain, localhost, $mydomain

#local_recipient_maps = unix:passwd.byname $alias_maps
#↓
local_recipient_maps = proxy:unix:passwd.byname $alias_maps

mynetworks = 192.168.0.0/24, 127.0.0.0/8

relay_domains = $mydestination

relayhost =

#alias_maps = dbm:/etc/aliases
#↓
alias_maps = hash:/etc/aliases

#home_mailbox = Maildir
#↓
home_mailbox = Maildir/

#luser_relay = admin+$local
#↓
luser_relay = unknown_user@localhost

#smtpd_banner = $myhostname ESMTP $mail_name ($mail_version)
#↓
smtpd_banner = $myhostname ESMTP unknown

#smtpd_tls_cert_file = /etc/pki/tls/certs/postfix.pem
#↓
smtpd_tls_cert_file = /etc/letsencrypt/live/mail.example.com/fullchain.pem

#smtpd_tls_key_file = /etc/pki/tls/private/postfix.key
#↓
smtpd_tls_key_file = /etc/letsencrypt/live/mail.example.com/privkey.pem

#サーバーがTLSに対応している場合、TLSを使用する
smtp_tls_security_level = may
meta_directory = /etc/postfix
shlib_directory = /usr/lib64/postfix

# 最終行へ下記を追加(SMTP認証設定)
smtpd_sasl_auth_enable = yes
smtpd_sasl_local_domain = $myhostname
smtpd_recipient_restrictions =
    permit_mynetworks
    permit_sasl_authenticated
    reject_unauth_destination

# 受信メールサイズ制限
message_size_limit = 10485760

# TLSログレベルの設定
smtpd_tls_loglevel = 1

# 暗号に関する情報を "Received:" メッセージヘッダに含める
smtpd_tls_received_header = yes

# 接続キャッシュファイルの指定
smtpd_tls_session_cache_database = btree:/var/lib/postfix/smtpd_scache

# キャッシュの保持時間の指定
smtpd_tls_session_cache_timeout = 3600s
master.cf 編集
vi /etc/postfix/master.cf
submission inet n       -       n       -       -       smtpd
  -o syslog_name=postfix/submission
  -o smtpd_tls_security_level=encrypt
  -o smtpd_sasl_auth_enable=yes
  -o smtpd_reject_unlisted_recipient=no
#  -o smtpd_client_restrictions=$mua_client_restrictions
#  -o smtpd_helo_restrictions=$mua_helo_restrictions
#  -o smtpd_sender_restrictions=$mua_sender_restrictions
  -o smtpd_recipient_restrictions=permit_sasl_authenticated,reject
  -o milter_macro_daemon_name=ORIGINATING

smtps     inet  n       -       n       -       -       smtpd
#  -o syslog_name=postfix/smtps
  -o smtpd_tls_wrappermode=yes
  -o smtpd_sasl_auth_enable=yes
#  -o smtpd_reject_unlisted_recipient=no
#  -o smtpd_client_restrictions=$mua_client_restrictions
#  -o smtpd_helo_restrictions=$mua_helo_restrictions
#  -o smtpd_sender_restrictions=$mua_sender_restrictions
  -o smtpd_recipient_restrictions=permit_sasl_authenticated,reject
#  -o milter_macro_daemon_name=ORIGINATING

# smtps セクションの下あたりに以下を追加
# SASL authentication with dovecot
  -o smtpd_tls_security_level=encrypt
  -o smtpd_sasl_auth_enable=yes
  -o smtpd_sasl_type=dovecot
  -o smtpd_sasl_path=private/auth
  -o smtpd_sasl_security_options=noanonymous
  -o smtpd_sasl_local_domain=$myhostname
  -o smtpd_client_restrictions=permit_sasl_authenticated,reject
  -o smtpd_recipient_restrictions=reject_non_fqdn_recipient,reject_unknown_recipient_domain,permit_sasl_authenticated,reject
ルックアップテーブル作成
postmap /etc/postfix/access
Postfix 起動と自動起動設定
systemctl start postfix && systemctl enable postfix
Dovecot 設定
vi /etc/dovecot/dovecot.conf
#protocols = imap pop3 lmtp submission
#↓
protocols = imap pop3

# 最終行に追加
service auth {
  unix_listener /var/spool/postfix/private/auth {
    user = postfix
    group = postfix
    mode = 0660
  }
  user = root
}
vi /etc/dovecot/conf.d/10-master.conf
service imap-login {
  inet_listener imap {
    port = 143
    #port = 0
  }
  inet_listener imaps {
    port = 993
    ssl = yes
  }
}

service pop3-login {
  inet_listener pop3 {
    #port = 110
    port = 0
  }
  inet_listener pop3s {
    port = 995
    ssl = yes
  }
}

service submission-login {
  inet_listener submission {
    port = 587
  }
}

# SASL 認証ソケットファイルを指定
service auth {
 (略)
  # Postfix smtp-auth
  #unix_listener /var/spool/postfix/private/auth {
  #  mode = 0666
  #}
 #↓
  unix_listener /var/spool/postfix/private/auth {
    mode = 0660
    user = postfix
    group = postfix
  }
}
vi /etc/dovecot/conf.d/10-auth.conf
#disable_plaintext_auth = yes
#↓プレインテキスト認証を許可
disable_plaintext_auth = no
#auth_mechanisms = plain
#↓
auth_mechanisms = plain login
vi /etc/dovecot/conf.d/10-ssl.conf
# SSL接続有効化
ssl = no
#↓
ssl = yes

# 証明書と秘密キーを指定
ssl_cert = </etc/letsencrypt/live/mail.example.com/fullchain.pem
ssl_key = </etc/letsencrypt/live/mail.example.com/privkey.pem
vi /etc/dovecot/conf.d/10-mail.conf
#mail_location =
#↓ Maildir形式にする
mail_location = maildir:~/Maildir
ログの出力先を変更
vi /etc/dovecot/conf.d/10-logging.conf
#log_path = syslog
 ↓
log_path = /var/log/dovecot/dovecot.log
ログ出力先のディレクトリ作成
mkdir /var/log/dovecot
Dovecot 起動、自動起動設定
systemctl start dovecot && systemctl enable dovecot
証明書の自動更新設定
crontab -e
毎朝 5 時に証明書を自動更新し Postfix と Dovecot をリロード
0 5 * * * certbot renew -q --deploy-hook "systemctl restart postfix dovecot"
Postfix ログの設定
SSLメールサーバ構築メモ Postfix + Dovecot【2024年版】 | あぱーブログ を参考にさせて頂いた。
出力先ディレクトリ作成
mkdir /var/log/mail
出力先の変更
vi /etc/rsyslog.conf
mail.*                                                  -/var/log/maillog
#↓変更
mail.*                                                  -/var/log/mail/maillog
syslog リスタート
systemctl restart rsyslog
不要なログを削除
rm -f /var/log/maillog*
ローテーション設定
vi /etc/logrotate.d/rsyslog
# 下記を削除
/var/log/maillog
vi /etc/logrotate.d/maillog
# 下記を追加
/var/log/mail/maillog {
    daily
    missingok
    dateext
    rotate 60
    sharedscripts
    postrotate
        /bin/kill -HUP `cat /var/run/syslogd.pid 2> /dev/null` 2> /dev/null || true
    endscript
}
Dovecot ログの設定
vi /etc/logrotate.d/dovecot
vi /etc/logrotate.d/dovecot
# 下記を追加
/var/log/dovecot/dovecot.log {
    daily
    missingok
    dateext
    rotate 60
    sharedscripts
    postrotate
        /bin/kill -USR1 `cat /var/run/dovecot/master.pid 2>/dev/null` 2> /dev/null || true
    endscript
}
saslauthd 起動、自動起動設定
systemctl start saslauthd && systemctl enable saslauthd
ファイアーウォールの設定
firewall-cmd --add-service={smtp, smtp-submission, smtps, imaps} --zone=public --permanent
firewall-cmd --reload
後々、判明したことだが smtp 25番ポートを開かないと Gmail とのメール送受信ができない
SASL による認証方法は UNIX ユーザー認証(PAM認証)で行うこととする
新規でノーログインユーザー info を追加してみる
info はデフォルトだと追加できないので下記の設定をする
vi /etc/aliases
#以下をコメントアウト
#info:          postmaster
反映させる
newaliases
info ユーザー追加
useradd -s /sbin/nologin info
パスワード設定
passwd info
パスワード入力、Enter を繰りかえして
passwd: 全ての認証トークンが正しく更新できました
が表示されれば OK
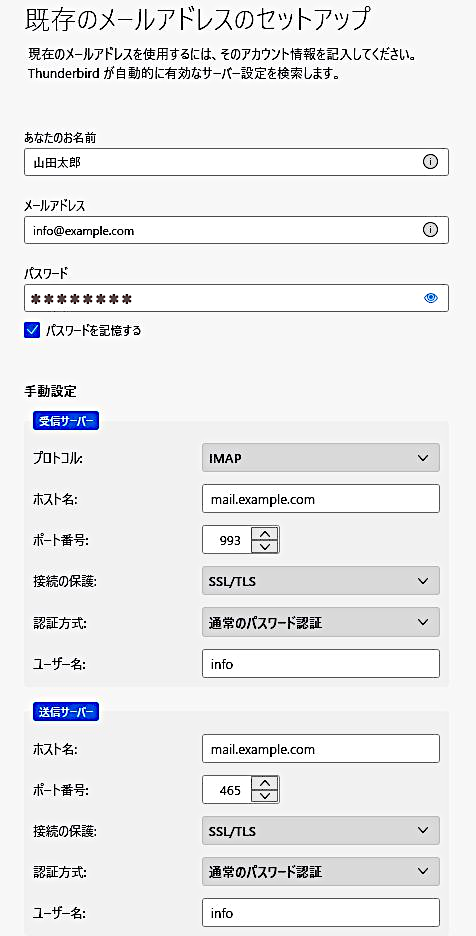
あとは Thunderbird 等のメールソフトで設定すればいい
ここの例だと下記の設定内容になる

